 The
Landmark KS-299 Case Review
The
Landmark KS-299 Case Review
The funny thing about doing case reviews is that
the perfect case for one person is totally inadequate for another. Some want
a large case.Some want a nice looking tower on their desk. Others want a sturdy
case for carrying to LAN parties. Heat dissipation is the pinnacle of performance
to some while ease of component install is to others. And of course to some
very fringe personalities out there nothing short of an armored case will
do.
So as a consumer what should one look for in a case? As opinions differ I
will present the Superpower Landmark KS-299 mid tower case. While this case
may not present itself as a perfect solution to all I think the majority of
people will like this case.
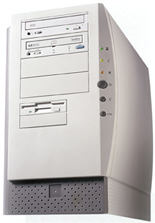
Features:
1. ATX format
2. one 80mm intake cooling fan included
3. accommodates one 80mm exhaust fan (optional)
4. four full bays
5. four 3.5" bays (two 3.5" internal bays for harddrives)
6. standard 250 watt power supply (300 watt optional)
7. dimensions 7.8" wide x 14.25" high x 19.5" deep
First Impressions
I had seen this tower
advertised at a few sites. One site gave this case a different name and
used it as their standard overclocking system case. What struck me about
this unit was it's classification as a midtower though it had four full
bays. Three full bays appears to be standard on most midtower cases these
days. Of course the unique look of the case drew my eye to it. I know many
like a plain square beige case but the exterior of this case screams individuality.
For those who look to features pay attention that an intake fan is included
and the unit is equipped with a 250 watt power supply although a 300 watt
power supply is optional.
Upon removing it from
it's box (more like crate) I realized this was a very sturdy unit. The case
approaches 30 lbs.! This should tell anyone who doubts it's construction
that this case is not just a pretty face. Once you remove it from the box
you'll probably realize as I did that this case is larger in person than
it appeared in pictures. Already I was liking this thing. But there are
more important aspects to a case than it's size or appearance.
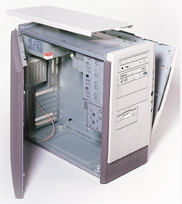
When looking at the
case you will notice that it doesn't have a removable metal shell to access
the interior. I found the sliding panels supplied with the case increased
it's ease of use and made for a much more reliable closure than the standard
pull off cover. The panels (on both sides) lock into place and are retained
by the top cover which slides into place and uses one screw to secure it.
I felt at this point that a thumb screw should have been provided as this
case appears to be geared to those who access their system's internals regularly
and not those who are concerned with locking their system shut. The panels
are over 1" thick. This is a definite aid in sound deadening. However
this will be a problem for those who like to cut into their case and mount
extra fans such as the cases used by some overclockers.
I mounted my Abit BX6r2 into the case with ease. This is significant as
the Abit board is a very large piece. I found that the case had ample room
and I didn't have to maneuver the board into place. This will be very important
to those of you who regularly access your motherboard. Power cables are
more than adequate in length and the motherboard power supply cable is the
perfect length for this board. The intake fan that ships with the unit is
designed for connection to the motherboard. Keep that in mind if you've
run out of power connectors on your board so you won't get caught running
to the store to buy an adapter. In the included picture of the interior
you will note that there is a cage to mount an exhaust fan however the unit
does not ship with one as depicted in the picture. I used a PPGA Celeron
366 overclocked to 550 MHz @ 2.1 volts using a slotket adapter for testing.
I utilized the Hardware Doctor utility supplied with the Abit board as it
supplies an audible alarm if the system crosses into high temperatures.
The power supply mounts at the topmost area of the case. I don't personally
like power supplies that mount lower in the case as I feel they create dead
air spaces below them. Very few power supplies have an adequate fan to cool
the system so I like to see an extra exhaust fan either below or beside
the power supply. In this case the exhaust fan mounts directly below the
power supply. This was handy as it was directly next to CPU slot on the
motherboard. When the system had been gamed on for several hours I noted
that the air exiting the exhaust was hot though the system temp. reported
by Hardware Doctor had only risen 1 to 2' Celsius. Some may feel I should
have tested this case without the optional exhaust fan. I feel since this
is the only option readily available to this case it should be used. By
all means if your case has accommodations for extra fans use them. It is
unfortunate that there are no other accommodations for intake or exhaust
fans as I would prefer to have one more of each.
Installation and
Testing
This section basically
deals with the installation of the drives and cable management. As mentioned
before the case features four full bays. I installed my HP CD-Writer in
the topmost bay and 40x CD-Rom below it. If you look at the pictures I found
on the Landmark website you'll see the CD-RW mounted below the CD-Rom. Depending
on the amount of work you do with your CD-RW this can be a very bad idea.
I've seen CD-RWs cook the CD-Roms above them and render the CD-Rom useless.
Mounting the CD-RW on top will also facilitate it's ability to have it's
heat rise and be exhausted by the case with the least amount of interference
by other components and cables.
One especially nice thing about this case is that it doesn't utilize drive
rails. This makes swapping components much faster. I've suffered from enough
broken drive rails due to the repeated insertion and removal of components.
This feature is especially handy for someone who upgrades his components
regularly or swaps them for testing purposes. The 3.5" bays reside
directly below the full bays. There are small tabs provided to support harddrives
in their area. This is a nice feature if you find yourself mounting one
harddrive over another as the lower drive is not supporting the weight of
the drive above it. I was able to remove the lower harddrive with no contact
to the drive above it.
I was lucky in that the IDE connectors for the ABIT motherboard are on the
edge closest to the peripherals. This allowed me to run the cables to the
drives and tuck them away. This effectively meant there was no restriction
to airflow due to IDE cable routing. I did encounter one unusual occurrence
during testing. Midway through testing I switched from a 5400 rpm Maxtor
drive to a 7200 rpm Maxtor drive. 7200 rpm drives are known for their increased
heat production. After the switch I encountered an across the board reduction
in motherboard and CPU temp of 2' to 4' Celsius. I don't use power-savings
on my harddrives so I cannot explain why the faster spinning drive would
make such a marked reduction in temp. since it doesn't spin down. I would
like to note that no matter which drive I was using the temp. difference
between motherboard and CPU temp consistently stayed within 3' Celsius of
each other. Hardware Doctor defaults to a warning temp. of 40' Celsius for
both the CPU and motherboard. I only triggered the alarm once after 8 hours
of testing with Quake III Arena Test and Unreal Tournament. This was a combined
effort between myself and my nephew in case your concerned I need to go
into a twelve step program. In testing I found the normal motherboard temp.
ranging between 35' Celsius to an extreme of 39' Celsius. The CPU normally
ran between 36' to 38' Celsius though after my severe duty run it finally
hit 40' Celsius.
With the main access panel removed I noticed a drop of 4' Celsius in both
CPU temp and motherboard temp. after the system had already been running
for a few hours. This is a strong indication that more fans would drop the
as tested temperatures. Those with more rigorous overclocking demands may
find that this case does not meat their cooling needs. The Celeron 366 at
550 seems to be pushing the limits of normal cooling for this case. The
only easy solution to this problem would be to mount intake fans in one
of the 5.25" bays to draw more air into the case. Any other solutions
would require some fabrication. That alone may send some to another case
vendor. For the average user to moderate overclocker this case appears to
have sufficient cooling as long as they install an exhaust fan.
Pros:
* Styling
* Four full bays
* 80 mm intake fan is included
* Convenient access panels
* Placement of the optional exhaust fan is very good
Cons:
* Provision for only one exhaust fan after which there are no more fan accommodations
*
Side panels would be difficult to modify for extra fans
* No thumbscrew provided to lock the access panels in place
Conclusion :
Superpower has produced quite an interesting product with the Landmark KS-299.
I feel that anyone who would classify themselves in the average group of
users would be happy with this case. Those who run to the extremes will
most likely find themselves happy with either a full tower or a mid tower
with accommodations for more intake and exhaust fans. I personally overclock
anything I can get my hands on as well as changing my drives very regularly.
After two months with this setup serving as my primary system I am quite
happy with my ability to make changes to it's configuration. The styling
is quite simply love-it or leave-it. That suits me fine as I like not having
a beige slab on my desk. It's large size and weight once I installed my
hardware would probably herniate anyone intending to carry it for long periods
of time so I feel a lighter case would probably suit the serious LAN party
gamer better.

