Installation
and Setup
 The
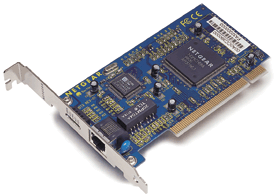
first thing I usually setup whenever I do a networking project are the NIC
cards. I'd much rather find a problem there and get hungup at that point rather
than after a couple of hours of cabling. Netgear's packs 2 of their FA310TX
network cards in this kit. I have to say that these are probably the nicest
NIC cards I've come across. Not only are they that pleasing blue color, they
are also very compact. I'm happy to report that the install of these NIC cards
went without a hitch. While that is not surprising, I have had a couple of
installations go south with NIC cards that were of poor design or whose drivers
were less than up to snuff. It is hard to tell from the picture to the right,
but these NIC cards have more than just the standard Link and Activity lights.
There are five LED's on these cards. Talk about information overload, but
that's really a good idea. Having to troubleshoot your install? Why not look
behind the computer at the NIC card and decipher what all those LED's are
trying to tell you about the status of your network.
The
first thing I usually setup whenever I do a networking project are the NIC
cards. I'd much rather find a problem there and get hungup at that point rather
than after a couple of hours of cabling. Netgear's packs 2 of their FA310TX
network cards in this kit. I have to say that these are probably the nicest
NIC cards I've come across. Not only are they that pleasing blue color, they
are also very compact. I'm happy to report that the install of these NIC cards
went without a hitch. While that is not surprising, I have had a couple of
installations go south with NIC cards that were of poor design or whose drivers
were less than up to snuff. It is hard to tell from the picture to the right,
but these NIC cards have more than just the standard Link and Activity lights.
There are five LED's on these cards. Talk about information overload, but
that's really a good idea. Having to troubleshoot your install? Why not look
behind the computer at the NIC card and decipher what all those LED's are
trying to tell you about the status of your network.
 The
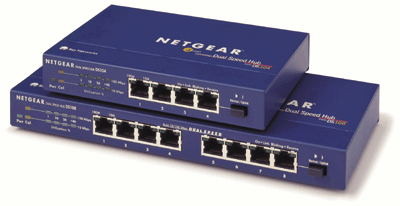
installation of the hub also went very well. All the necesary connections
are clearly labeled and conveniently located on the front of the unit. In
the picture to the right the hub included with this kit is the unit on the
top. Sorry, you'll have to fork over some more cash for a hub with an 8 port
capacity! Most home based networking products have all their ports and other
connections on the rear but I don't like that layout too much. What most people
discover is what professionals discovered a long time ago: it gets to be quite
annoying when you can't reach the rear of the unit easily to make changes
in the network setup. Take your pick, a unit that has the connectors in the
front or the back, but I'd rather see connectors that are easily accessed.
The hub not only features the standard LED's that let you know whether your
NIC's are running at 10 or 100 MBps, but it even features a percentage scale
that displays the utiliaztion of the unit. Another great feature is the normal/uplink
button that is on the right of the unit. If you are using the unit as a typical
hub simply select normal. If you are using it behind a router or another hub
then select uplink. Couldn't be any easier than that. One thing that isn't
clearly labeled on the front of the unit (except by that small white line)
is that port 4 is the uplink port. Packed in the box with the unit are the
hardware to mount the hub on the wall. That's a minor thing to point out,
but almost all hubs I've seen can be wall mounted - just they never seem to
come with the hardware to do it.
The
installation of the hub also went very well. All the necesary connections
are clearly labeled and conveniently located on the front of the unit. In
the picture to the right the hub included with this kit is the unit on the
top. Sorry, you'll have to fork over some more cash for a hub with an 8 port
capacity! Most home based networking products have all their ports and other
connections on the rear but I don't like that layout too much. What most people
discover is what professionals discovered a long time ago: it gets to be quite
annoying when you can't reach the rear of the unit easily to make changes
in the network setup. Take your pick, a unit that has the connectors in the
front or the back, but I'd rather see connectors that are easily accessed.
The hub not only features the standard LED's that let you know whether your
NIC's are running at 10 or 100 MBps, but it even features a percentage scale
that displays the utiliaztion of the unit. Another great feature is the normal/uplink
button that is on the right of the unit. If you are using the unit as a typical
hub simply select normal. If you are using it behind a router or another hub
then select uplink. Couldn't be any easier than that. One thing that isn't
clearly labeled on the front of the unit (except by that small white line)
is that port 4 is the uplink port. Packed in the box with the unit are the
hardware to mount the hub on the wall. That's a minor thing to point out,
but almost all hubs I've seen can be wall mounted - just they never seem to
come with the hardware to do it.
I'm big on install manuals. I hate to see a good
kit or component marred by a manual that is hard to understand - especially
for someone who is new to networking. Between the install guide and the guide
to file and printer sharing you can get the contents of a complete manual.
I think the logic of putting them on fold-out guides is that a person can
lay them out in front of them while they are in the process of installing
the kit. I won't argue with that logic since they are at least complete and
have plenty of diagrams and screen shots to guide the installer through the
process.
